
Step 6: Attaching the fuselage
Palette Wars
The next little step is the most "dangerous" of all -
the fight against the palette. Don't expect any help from the
palette, some say the EAW-palettes are good, some say useful,
some say they work well for the default skins - and I say
they are evil!
Many experienced people will say now "Hey, you can make
customized palettes work for the chosen aircraft!". I
know. For example Mustangs with wonderful blue noses, 109s with
red tails and spinners in most wonderful fading, true RLM...I
know. But if you use modified palettes with customized colors,
the compatibility to all graphic-devices gets lost sometimes. I
want to make skins that are compatible to all graphic-hardware,
and therefore it is useful to use what is already given, when you
make modifications with care. I modify palettes sometimes as
well, but I won't go into this topic here in this tutorial. It is
far more a challenge to make a plane compatile for all EAW-users
than one that works for your graphic-card only, and unfortunately
many skinners out there forget this fact easily...
You need a basic palette that can be used. My choice is the one from the Bf 109G-texture file. Open the P109gtex.pcx file, go to "Colors", and there to
"Save Palette". Save it as Default_EAW or so, the choice is up to you.
The palette is something shown like this:
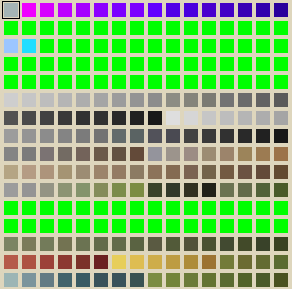 |
Some notes about the palette colors. It's a 256 color-palette with some special colors to remember:
No. 0 - 79: Transparency-definitions, if possible avoid these areas, they are not shown as they are in Paint Shop Pro, because they are used to paint transparent parts of the skin and transparency-files. Especially the No. 0 is important for the skin itself, the others are problematic, because some work only on TNT-cards, others only in Glide-mode, etc.
No. 176 - 207: Also , don't use transparency-definitions.
Some skins use palettes from cockpits, etc. and are therefore more colorful and sometimes much better than all similar skins with the basic palette. The problem is that they are not compatible with all graphic-hardware. Therefore I always try to use as much as possible the standard-palette of the Bf 109G, because it is compatible to all graphic devices. Sometimes I use the palette of the Bf 109E-cockpit for example, but then you have to know which colors are not Glide-compatible. As a general rule you can say that if the aircraft looks ok in the objects-view of EAW, it will display correctly on most graphic devices - but handle this advice with care.
Now, a little war starts!
1.: Take the plate and remember
that it is in 16 Million colors (a bit too much for EAW). Now, there are several techniques you can use to decrease
color depth of the plate.
One procedure needs the algorithm "dither" of
Paint Shop Pro. Go on to "Color", "Open
Palette" and open the EAW-palette, after you have switched under the panel where the palette-name is
"dither"-function.
I have a different way, and my way "forces" the plate
to have the EAW-palette - so here the procedure:
Because the details of the superb
plate from Claes Sundin are now a bit softened and not so clearly
visible, I adjust first on "Colors" Brightness and
Contrast, I decrease the brightness a bit and make the Contrast
higher. Suddenly the plate looks fresher and clear, a nice look
for a skin, isn't it? ![]()
And now the war begins: Go straight to "Color",
"Open Palette" and open the palette directly with
"closest color" - At this point I guess that
several more experienced people will open their mail
program to write me some lines about the primitive way I do
this...my apologies, but I like this method , and hey,
it's worked already before this tutorial!![]() The "dithering" works for other
problems, like breen/brown-tones, but you should never mix
both styles in a skin!
The "dithering" works for other
problems, like breen/brown-tones, but you should never mix
both styles in a skin!
You'll see that now the blue fuselage-band has become ugly.
But when you have adjusted the brightness and the contrast well,
the palette fits perfectly, and no big loss in detail occurs. But only sometimes. When you want to do a mostly green skin,
then you have to fight a little war against the palette - adjust,
open, undo, adjust, open, "shriiiieeekkkk!", undo,
adjust, open...etc. You can imagine how it is, or you will
experience it yourself.. (hehe!).
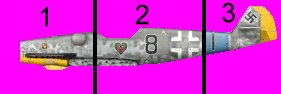
Slices of a plane
1.: Now, the adjustment to the texture-file has
to begin. Select the background of the plate with the Magic Wand, invert the selection and select the Selection-tool. With the selection-tool, it is now
possible to make a selection of parts of the plate . Make three pieces, like the ones shown
here (the lines and numbers are only to illustrate were I cut):
 |
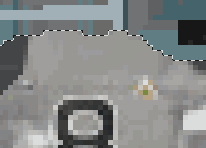
2.:We can put them on the place where they belong in the texture file by copy/paste. Don't worry if they are overlapping and the borders between them are visible, we will remove that with the Soften-Finger and the Cloning Brush. Open the texture file, and paste the parts into it. A good fix-point is the line between the gun-humps in the nose, the cockpit and the tailfin. After this procedure, you'll have something similar to this:
 |
Looks good, doesn't it?
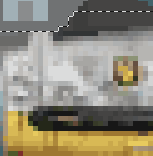
3.: Now you see that the plate is too small for
the rest of the default fuselage. So we select all of the basic-EAW-fuselage with the Selection-tool, quite some work, but
with [Shift] or [Ctrl] pressed easy to do. Now increase the
depth-depth again to 24bit.
After you have selected the fuselage (it takes some
time and imagination as to what is fuselage-texture and
what is not...but you'll manage that, I am sure!), we need
to fill up the missing parts. My tip is to use the
Cloning tool or the Retouche-tool with the style "Push"
(size 5-9, opacity and density 100, hardness 0).
With these tools, we fill up the gabs on the border, as shown
here:
 |
Note that you should not disturb markings and lines, when you meet a line, then make it longer with the "Push"-finger:
 |
Do everything on top of the
fuselage, but not the underside behind the cockpit. The yellow
nose must be prepared with the finger, too. As soon as you
finished it, open the EAW-palette for the skin.
4.: Use the Dropper
and the No. 0 color for the left mouse button, and the No.
111 for the right button. Now, use the Color-Replacer by
wiping over the selected fuselage (opacity and density 100,
steps 0, size as big as possible). You will not see the
effect of what you have done, but you will see black dots
on the skin if you don't do this procedure after opening the
palette to force the skin to the 256 colors...sometimes EAW uses
the color 0 for a kind of gray, but then the game wants to use
this pixel as transparency definition, and this causes the black
spots (on some graphic-devices even holes in the plane!).
Your picture should look similar to this:
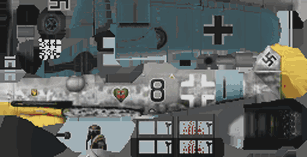 |
Note the not "painted" underside behind the cockpit, we'll come to that later.
Now it's time for the first test flight: Code the file with PicPac, start EAW and a mission with the Bf 109G. Be sure that you do not have other aircraft models in this slot, otherwise it will look strange. Choose a mission with only you as member of the flight, some clouds and day, then take off. In flight, it should look like this:
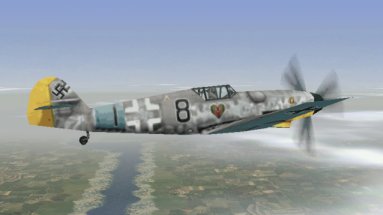 |
 |
You notice that the codes are
mirrored on the fuselage, as I used a plate with the number
8. The other thing is that the Swastikas are doubled, one is on
the skin, the other from EAW itself. And last but not least,
there is a big piece missing on the left side. Oh, and the intake
on the left side is very, very grey. We'll come to these
points later. Before they can be fixed, we have to do other
things first, ok?
Oh, a tip. Quit out of the EAW mission to the end-result on
the chalk-board. Press then [Alt][Tab] for multitasking with
Windows, to make things easier. EAW will be in the toolbar
of Windows, and you can switch between PSP, PicPac and EAW
quickly.
5.: So, we remove the Swastika and tail planes
with the tools we already know, such as the Cloning Brush or again with Softening
or so. The choice is yours. ![]()
I hope you like the look of the aircraft already, I must say that it looks as if the choice of the plate was good, also the adjustment of contrast and brightness, a good composition. Some people will now complain that it is does not conform to the RLM-color plate or that it is not historically accurate. But hey, that's best we can get from EAW-palettes, or better: with my knowledge...
Let's go on!