
Step 5: Preparing the fuselage
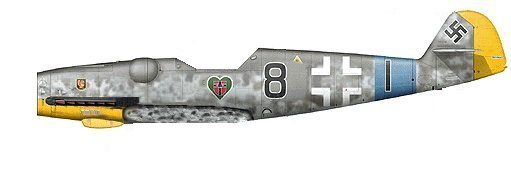
So, after creating the element-masks, we can move to the first step that will give the basic skin a new look. For this task, you have to openthe P109Gtex.pcx and our Sahl-109 color-plate.
Ok, what comes now can sometimes tear at your nerves, and sometimes you just want to throw away everything, because it does not work as good as you want it. But anyway, we'll give it a try now!
 |
What I do is a very simple job, at
the first look. I attach the plate to the texture of the Bf
109. This sounds very easy, and if you try to make this by simply
selecting the fuselage-plate with the Magic Wand and pass it to the EAW-texture,
you'll find out very quickly that there is a lot more to it
that that. Let's start.
Homogeneous
Background:
First of all, we need a homogene background of the plate.To
achieve this, we have to flood fill the background all white with
the Floodfill-tool. You can adjust the features of the
floodfill-tool by pressing the button indicated in this picture,
it opens a detail-box for every tool, so you can edit the
preferences:
Use opacity 100 and about 20-40
tolerance, then chose the color white and fill up the background.
If you chose too much tolerance, some parts of the plate will be
filled as well in white, so you may need to adjust the
tolerance from case to case.
Color Depth:
24bit!
This is essential. Go to the colors and select Increase Color
Depth, choose 16 Million colors (that's the Alpha and
Omega), the secret that serperates the 'hack-skins' from
fine skins, in my opinion. Now all tools can be used, and the
picture looks just the same. But the effect will be great, as we
will see.
Preparing the
plate
Now the first difficult task starts. When you look at the plate, you can't just copy/paste it into the EAW-texture, not
only because of the size and the colors, but also because
the wings are shown! They have to be removed, and I will
show you now how to do this...the secret lies in the Clone-Brush. You will have to practice this technique
a bit, or better still, a lot, until the result looks good
enough for your needs. Sometimes it just doesn't work, but in this case it does, as I chose the plate on purpose, man!
![]() .
.
1.: First thing to do is to select the
plate exclusively, not a single part of the background. Use
the Magic Wand for this, adjusting as required the
tolerance to get less white areas on the edges of the
fuselage-picture.
2.: Zoom in, at least 2:1, and choose the
Cloning Brush, in our case this means : Shape: round,
Density and Opacity: 100, Steps: 1, Hardness: 0, Size about 9.
The clone-tool takes the part that lies under the crosshair (set
with right mouse button) and copies it to the place where the
mouse-arrow is. This means that you can use the texture to extend
areas with the same parts. Now it's a bit difficult, but you have
to clone several texture-parts from the plate to cover the wings
well. Never use the cloning tool for a long line, make
"sparkles" of the cloned texture-parts, so the effect
of the camouflage gets more natural:
 |
3.: When you encounter hull-lines, use other
lines to make them longer with the cloning brush . If this
does not work, use the Paint Brush (density
1, opacity 1, size 1, steps 25, my tip for that) in black to draw
them with a few steps, similar to the the first one in
front of the green heart - oh yes, avoid cloning the markings!
4.: Remove the wings and the little oil
cooler, otherwise it will look quite funny on the final skin.
Note that you should make the imagined part behind the wings in
the same style as the rest of the aircraft. If you have
sharp lines that disturb you in the camouflage, you can soften
them with the "Finger", the Retouche-tool, style "Soften". The left
picture is before the finger is used, the right afterwards, you
see the effect:
 |
 |
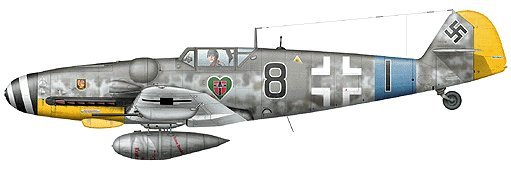
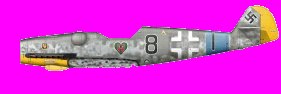
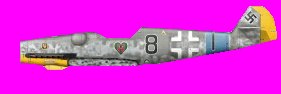
Finally, you should get a plate that looks something like this
(below). I have also removed the drop tank, spinner, cockpit
and all antennas by drawing white squares with the Shape-tool, as we do not need them for the
skin:
 |
You see that I have also made a
kind of wing-basis, we'll see what this is for...mostly for
nothing, but it looks a bit more finished like that...![]()
Save the picture as a 109_big_profile.psp file, for example. Never save these
files as jpeg- pictures, because jpeg uses an algorithm
for packing pictures so they are smaller in data. This causes a
loss in detail that is adjustable, although this is
just a surface-theory about jpeg. If you save them as
PSP-pictures, you will have big files, but the same quality as
when you closed the picture.
Resizing the plate
The whole plate looks fine now, but it is still too big. Now we
have to adjust the size to the EAW-skin, and we do this as
follows:
1.: I do this, quite honestly, by trial
and error. Go to the menu "Image" and use
"Resize". Make the picture about 50% in size, and
you'll see that the picture shrinks, and the details, too. Select
the background now with the Magic Wand, tolerance maybe 50, press
[Ctrl][Shift][I] and copy the selection by pressing [Shift][C]
(useful to learn, so it' becomes a reflex...).
Now open the P109gtex.pcx
file and increase the color depth to 24bit. The fuselage
faces in the same direction as our plate, so let's move on -
press [Shift][E] to pass the plate into the texture-file.
Oh man, far too small, isn't it?
So, undo this procedure, back to the plate and resize to
65%...finally, you'll find out that 55% is good for this plate,
but hey, it does not fit exactly! Man, is EAW wrong, Claes
Sundin, or I? I would guess it's me, but this time it's nobody:
The texture projection of the skin is not "flat",
therefore it's possible that the exact shapes are not shown in
the texture projection. Another fact is that the models in EAW
are not 100% accurate...ok, then it's EAW's error...
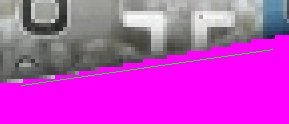
 |
2.: Before we adjust the plate, we have to
remove the white border that it always gets when we
copy/paste it to the texture.
Fill up the background with pink, use the tolerance for adjusting
it, until you found out how much it needs so the whole palette is
framed with pink. Sometimes elements of the plate can get
pink, too, so draw a thick fat line in pink with the
brush between the parts and the background, to keep the
flood away. Finally, it should look like this:
 |
Now take the tool that draws lines. Select under the properties size 3, no anti-alias, and draw lines sharp on the edge of the plate-plate, like this:
 |
To avoid the lines destroying the plate itself, draw them parallel to the border. When you encounter round shapes, make shorter lines - finally, the white border is removed, also some shadow-shadings, and the plate looks like this:
 |
Save it again as a PSP-file.