
Step 7: The Underside
Attaching the
underside
Remember the element masks from Step 4? Now we need the one with
the underside-texture mostly.
 |
Grab the underside by selecting the pink color with
the Magic Wand and press [Shift] . Repeat this process to select the inner pink parts. Then, invert the selection
again and copy the texture. Now open the P109Gtex.pcx file again.
Note: Make backup copies of the skin file! Call them whatever you want , but make backups...you would not be the first skinner to lose the work of days because of the lack of a lot of backups! Just a tip. |
1.: Increase the color depth to 24bit and paste the aircraft undersides to the picture. With the cut out Balkenkreuz, it's an easy task to place it correctly. Do not change the selection once it is placed, as we now need to adjust it to the fuselage!
2.: For this task, open the Brightness
and Contrast menu again and adjust the underside
surfaces until they match where the shades fade into the
fuselage camouflage. The basic underside we have is blue, but
this looks very odd and is not very accurate. Good results can be achieved when you turn the whole underside element-mask
into a gray scale picture ("Color" menu) before you
copy/paste it.
It needs good eyesight and some experience to get
a good result. Problems can occur as soon as you open the
palette to force the plane to 256 colors. Sometimes all
details of the underside disappear. So keep some contrast for the
details!
 |
What we will do now is
something not many skinners do, but I think it's worth the
trouble to get a better effect. We fade the underside
into the rest of the fuselage.
Fading into the
fuselage
Well, this sounds great, but is rather primitive, to be
honest...![]()
1.: Select the underside of the fuselage side-view, the parts that we did not fill up with the plate-plate, remember? Do yourself a favour and select a larger view, including parts of the fuselage itself - but cut out the Balkenkreuz and other code-details:
 |
And now, the "magic"
starts, but remember working with 24bit!
2.: Using the Dropper
suck up some paint from the part of the underside that will
fade into the fuselage. Take the Airbrush,
Opacity about 18-25, Density 80-100, size 5-9 and steps about
20-25, then start to paint from the border of the selection upward. Try to be careful the nearer you get to the basic plate scheme. It's here where you need to use the
airbrush carefully. Finally, you should get a result like
this:
 |
It may be necessary to edit
the underside-part a little bit, too.
In the air, it looks like this
(remember to force the EAW-palette to the skin first!):
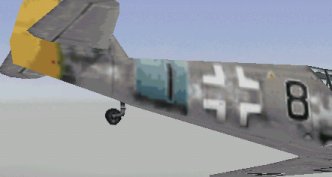 |
Yes, I know that the
fuselage-band, etc. still looks terrible....be patient!![]()
Now try to enhance the look of the Balkenkreuz near the
fading, also details like fuselage-lines, slots, etc. to improve
the look of the skin.