
Step 4: Element masks
After the first look at the skin-file, you will notice that there are several areas with almost the same color-shadings. You can clearly identify, more or less, the upper wing view, the underside, the fuselage, etc.
What we will need is the ability
to have access to special parts of the plane at once. Therefore
we have to separate them from the rest of the skin - surgery with
Paint Shop Pro! ![]()
But before we do that, here the tool-bar of PSP 5.03, so you know which tools I'm refering to when I mention them in the text:
 |
1.: Selection, 2.: Freehand, 3.: Magic Wand, 4.: Dropper, 5.: Paint Brush, 6.: Clone Brush, 7.: Color Replacer, 8.: Retouch, 9.: Airbrush, 10.: Flood Fill, 11.: Lines, 12.: Shapes
Note that there are differences in each PSP-version! All tools in 5.03 are included at higher versions, but sometimes in the sub-functions. This tutorial is not a "how to use PSP" tutorial, so it's best to find out what ,basically, these tools are used for. Other graphics -software use similar tools, but you'll need to research these first to find out the differences in use.
![]()
Ok, and now, let's go!
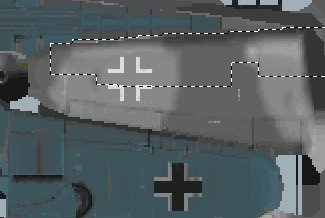
1.: You have already opened P109gtex.pcx, fine. Now you can zoom in a bit (if you have a mouse 'wheel' you will find this procedure easy as it's a very useful piece of hardware). Now you can start to select the upper wings with the Selection-tool:
 |
When you press [Shift] and then
use the tool, you can select multiple areas independently,
this is the only way how this task can be done.
You will note that the figure of the wings is more or less
homogenized and has no fading into other texture parts. Sometimes
it's very, very hard to see if this pixel still belongs to wings
or already to the pilot's nose...![]() .
.
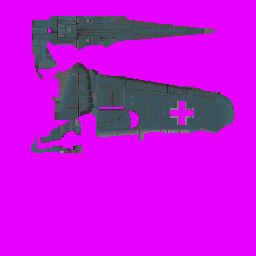
As soon as you have selected all upper wing textures, you can
press [Ctrl][Shift][I], which inverts the selection and
makes the selected detail stand out. Then you can take the
Airbrush, and paint everything that is not upper wing view in
pink (yes, pink, that's correct, don't be too shy!).
Your final result should look like this:
 |
Save this picture as a PSP-file (NOT jpeg or gif, we will come to this difference later), such as 109G_basic_wings.psp, and close it.
2.:Then open the P109Gtex.pcx file again, which should still look
like the basic EAW-texture, and start to select the whole
underside, inclusive of wheel-covers, etc. using the
same technique, to finally looking like this:
 |
Note that I left out the
Balkenkreuz, intakes, landing gear slot, etc. by pressing [Ctrl]
while using the selection tool. This trick helps you a lot
afterwards when we have to fit the shading of the underside to
the rest of the plane.
Save this file again as a PSP-file, such as 109_basic_underside.psp
These types of files were used as the base for almost every 109 I have completed. Now we have access to the wings and undersides in separate files, this will be very useful in the future, believe me. These element-masks are sometimes very hard to make, but they are worth the trouble. For the 109G, it's relatively easy to do them, but there are other aircraft with more difficult texture-definitions. You can store them in a separate folders for future skins.
Ready for the next step?